
Meet Titan, the Rietta AI Research Lab Server
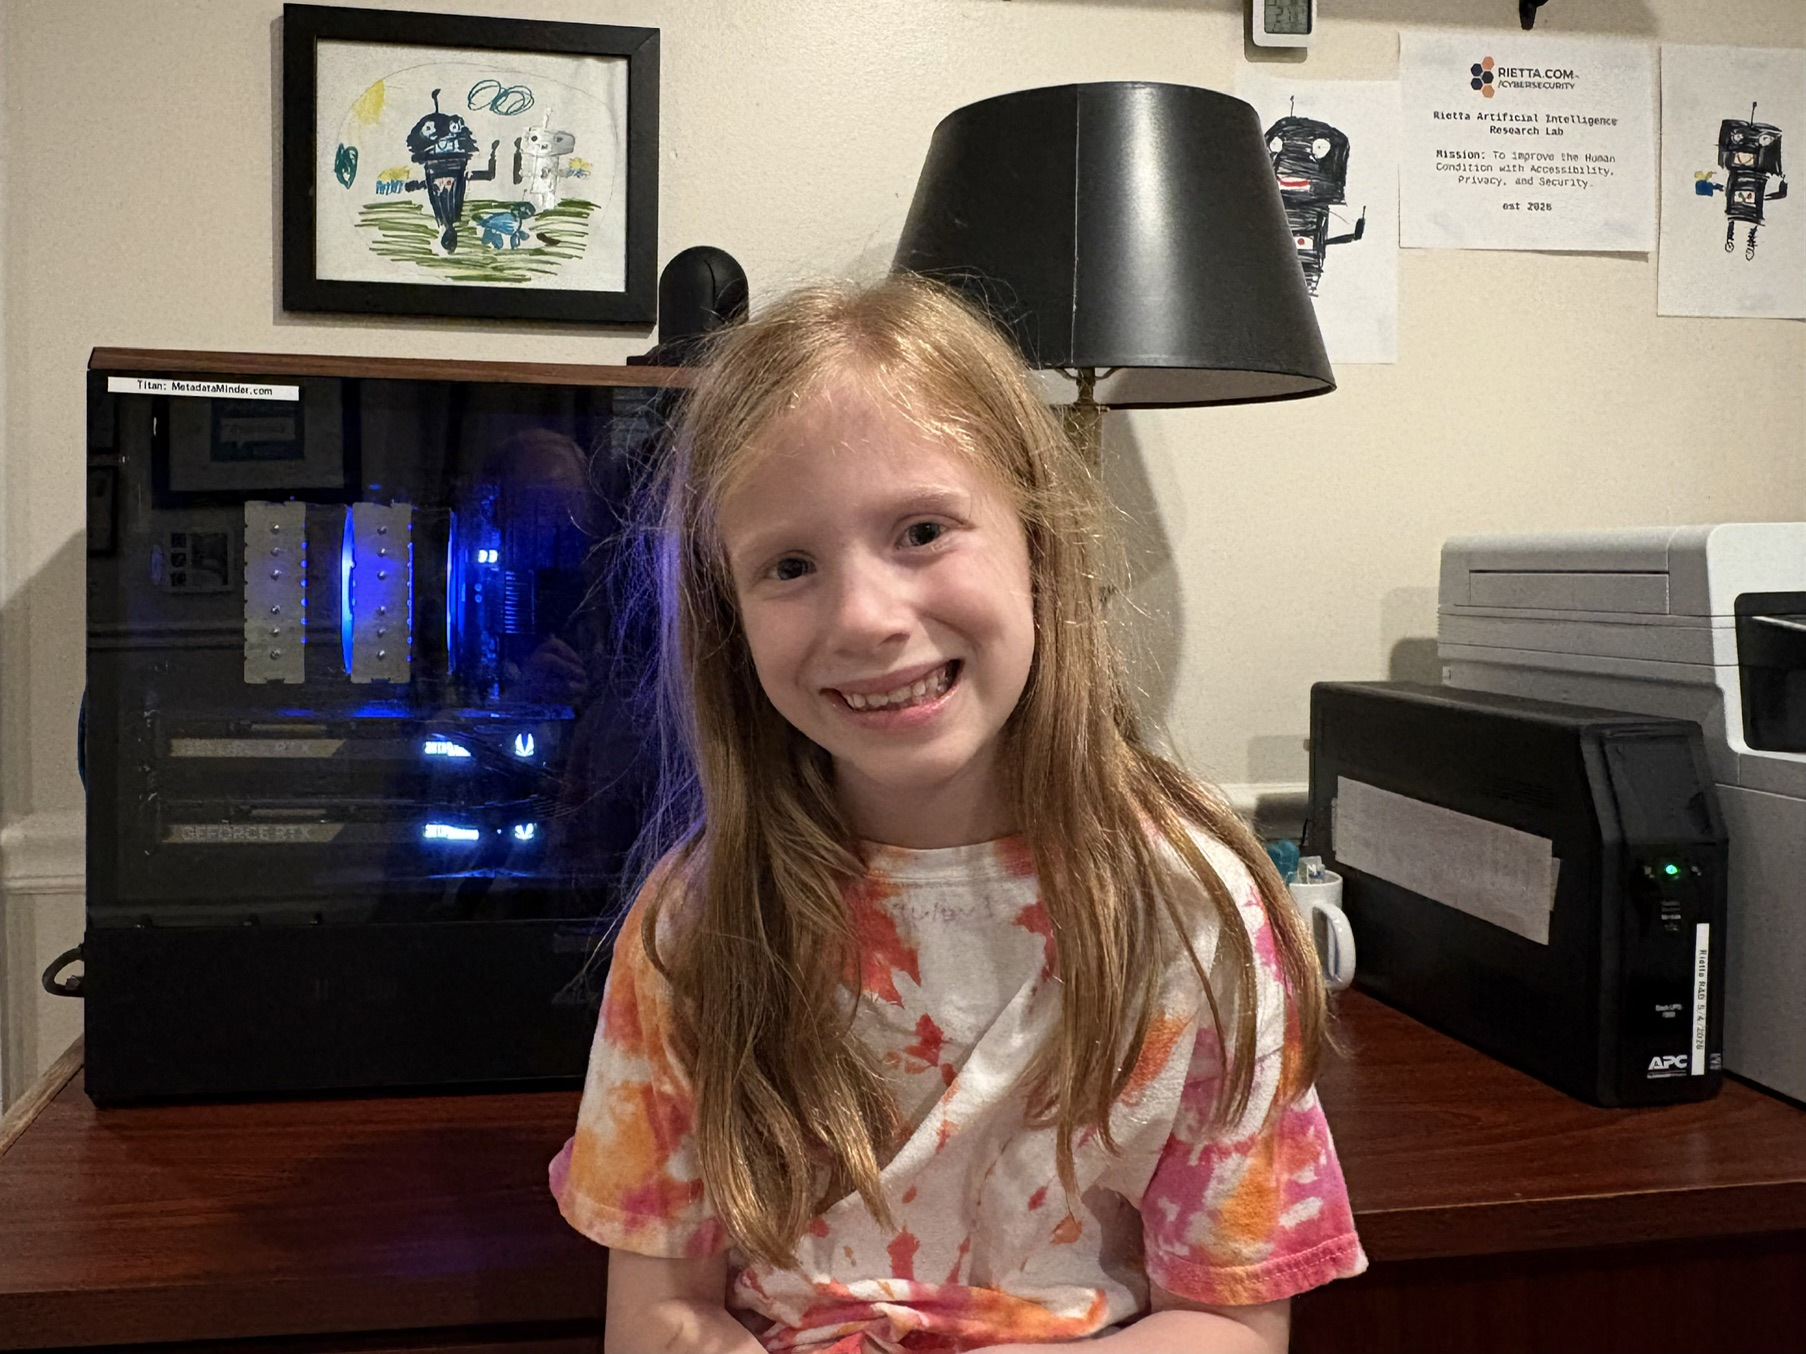
Every research lab needs a workhorse, and ours just got one in May. I’d like to introduce Titan, the newest machine in the Rietta AI Research Lab and the compute backbone behind our AI research, including Metadata Minder.
The Spec Sheet
Titan is built around an AMD Ryzen 9 9900X (12 cores, 24 threads), 64GB of DDR5, and dual NVIDIA RTX 5070 Ti GPUs for 32GB of combined GDDR7 VRAM. Storage is a fast NVMe system disk plus a pair of 16TB drives for the bulk data side, running Ubuntu Server 26.04. That combination gives Metadata Minder’s classifier stack, local model inference, and TrueDate™ dating pipeline plenty of room to work without stepping on each other. The classifier stack is what scans a government website’s entire published document corpus for ADA Title II and WCAG 2.1 conformance gaps and other metadata deficiencies, exactly the kind of high-volume, small-inference workload that benefits from spreading across two GPUs rather than one larger one.
Funny enough, Titan is not actually the most RAM-heavy machine in the office. My main workstation has 128GB of DDR5, simply because it was built before the current memory market got expensive. Titan runs with half that and leans on SSD swap when it needs the overflow, which has been a perfectly reasonable trade-off for the workloads it’s carrying.
The Micro Center Run
Getting the parts involved a 10 AM trip to Micro Center after a late night of the usual kid bedtime routine followed by several hours of development work on this new AI-based document project. I quickly realized my current NVIDIA 4070 GPU wasn’t going to cut it. After dropping the kids at school, that morning “tired engineer” was less of a persona and more of a plain description.
I knew ahead of time that Micro Center’s one-per-household limit on the RTX 5070 Ti would be a hitch, so I prepared a little low-key, totally honest social engineering to improve my odds of buying what I needed that day.
I built the parts list ahead of time in LibreOffice Calc, walked in with an old Rietta.com business card and a Georgia Tech hat that’s seen better days, and headed straight for the Build Your Own desk.
I laid out the full build for the associate: the advertised AMD 9900 CPU bundle, storage, case, extra RAM above the bundled amount, and PSU all in the same cart, all going toward a single AI-enabled document analysis research and development server. The workload of numerous small inference tasks benefits from multiple GPUs rather than one larger GPU, and I explained to the associate that wasn’t a price preference, it was a technical need.
The associate seemed to enjoy the whole scenario and was willing to take the GPU limit override to his manager. Between the complete build, the manifest, and a manager willing to hear out the use case, they made the exception. Total spend for the day landed right around $5,600, and I let their techs handle the physical assembly so I could run other errands and get back to the software side sooner. I’ve built plenty of my own machines over the years, but this time getting the extra hours back was the better trade.
Titan came home and got set up next to the printer in my office.
As a side note, anyone in Metro Atlanta should recognize we’re fortunate to have two Micro Center locations. Give them your business rather than just ordering online. I’m grateful to walk in and get gear like this in person rather than wait on a shipment.
The Software Configuration
The physical build is not the end of the story, my goal was to get Titan running as a headless server that was capable of remote reboot. The first step was installing the Ubuntu Linux operating system using a USB boot disk. Ubuntu Server was the pick over Debian even though most of our Docker images are Debian-based under the hood, mainly because it gave me a much easier path to the disk encryption and NVIDIA driver support I wanted without fighting the OS the whole way. I’m not saying that this system could not be fully configured on Debian, but I am more familiar with Ubuntu as the bare metal host system. The Debian containers don’t care either way, they run the same on top. That went smoothly enough, but then followed about a day of figuring out exactly how I wanted to configure the thing since there was no run book for setting up Docker, two NVIDIA GPUS load balanced, and more.
Storage was its own small decision tree. With “only” 64GB of RAM to work with, I skipped ZFS, since its caching habits have a way of eating memory I’d rather hand to inference workloads, and went with plain mdadm and ext4 instead. It’s a boring, well-understood combination, and boring is a feature when you want a machine that just runs reliably.
The RAID Took a Few Days to Provision
Getting the storage array stable turned into its own multi-day project. The RAID-1 mirror is Linux software RAID via mdadm, and the motherboard is a gamer-class board, which showed: a power management setting meant for a machine that idles and sleeps between gaming sessions, not one that’s expected to run continuously, kept getting in the way of the array staying up.
The issue was that the machine would lock up without warning and require a hard reboot. Ultimately the issue came down to the PCIe power management, which had to be disabled by editing /etc/default/grub with:
# 5/6/26 custom config to keep AMD ASMedia controller from going into a low powerstate and crashing RAID operations
GRUB_CMDLINE_LINUX_DEFAULT="pcie_aspm=off iommu=pt"
While I could have solved this problem with a server-class motherboard, this was not a bad close second and much more affordable for a lab environment.
Once it was sorted, the mdadm array has been solid ever since.
Two Keys, Two Threat Models
One detail I like about Titan is that it unlocks in two completely different ways, on purpose. The OS disk is tied to the machine’s own hardware, so it can come back from an unattended reboot, a scheduled restart, a power blip while I’m traveling, whatever, with SSH and the Cloudflare tunnel ready to go on its own. This was relatively easy to set up with Ubuntu 26.04’s first class TPMv2 support. The end result is the operating system will fully boot unattended to a slightly modified Ubuntu Linux server system but none of the data is accessible yet.
The data itself is a different animal, on purpose. That volume lives on the RAID-1 mirror of the 16 TB spinning disks (more on why RAID-1 earns its keep here), locked behind a passphrase that has never been present on the machine itself. Every time Titan reboots, I log in and execute a custom script to unlock the volume and start the Docker daemon before the Metadata Minder stack comes online. It’s a small extra step on my end, but it means if the whole box walked out the door, or someone just pulled the drives, there’s nothing automatic handing over the data.
It’s an interesting tension to design around: remote administration wants a machine that comes back on its own, and physical security wants exactly the opposite. For a laptop, standard full disk encryption is what you want as there is always an operator to provide the secret key. In a server environment, remote reboot is what you want because destroying the key crypto shreds the disk before disposal. However, my lab system does not have the data center security posture of a man trap and armed perimeter security, so I had to do something different.
Titan gets both by drawing the line between the boot disk and the data itself rather than treating the whole machine the same way. In the end, if someone broke into the lab now and stole the whole system they get no data and if the system drive is removed from the motherboard it has nothing on it to recover.
Dealing with RAM Restrictions and Memory Pressure
The same instinct to be deliberate about what should and shouldn’t persist past a reboot shows up again here, for a completely different reason: cost, not threat modeling. If I had built Titan in 2023-2025, I would have loaded it up with the maximum DDR5 RAM the motherboard supports, likely 256GB. With that much RAM, the standard Linux setup would have been sufficient. But times have changed: RAM prices have absolutely soared, and larger kits simply weren’t available at retail. In early 2025 I paid around $300 for 128GB of RAM; this time, I paid over $800 for the 64GB I was able to get, and was grateful for it.
Ephemeral Encrypted Swap
But this design constraint still needed solving, because Titan can’t stop working just because of RAM pressure. The age-old solution is swap, and the standard anemic amount provisioned by default wasn’t going to cut it.
Provisioning an actual swap partition, not a file, was the right call. And unlike the OS disk, which needs to come up bound to the TPMv2 chip, a random key assigned fresh at boot is the right solution here: on power off, the key vanishes and anything sitting in swap disappears with it. The process for setting this up on Ubuntu is well documented; I believe I followed the guide at How to Configure Encrypted Swap on Ubuntu to set up and mount the swap partition in my /etc/fstab:
# The ephemeral swap
/dev/mapper/crypt_swap none swap sw 0 0
Ephemeral Encrypted Scratch
The next storage problem to solve was temporary files. Scanning and processing hundreds or thousands of documents at scale means a lot of writing to disk and running various CLI tooling through pipelines. The standard setup sends all of that to /tmp, which is often mapped as tmpfs in RAM. That’s fast, but we don’t have RAM to spare for it, so using the onboard SSD for scratch storage was a must.
I solved this by provisioning 256GB as a distinct partition on the NVMe system disk. The path here isn’t quite as well worn as encrypted swap, but the principles are the same.
Creating the partition itself follows the usual instructions, which you can find in plenty of places. Once the device was ready, in my case /dev/mapper/crypt_scratch, I used systemd to make sure it was formatted and mounted before fstab tried to touch it.
First, a script that waits for the device to appear and formats it. This matters because the key is ephemeral and gone on every boot, so a brand new key means the underlying block device is just random noise until something reformats it. I put this at /usr/local/sbin/prep-scratch.sh:
#!/bin/bash
echo "Preparing ephemeral scratch volume..."
# Wait up to 10 seconds for the device to appear
for i in {1..10}; do
    if [ -b /dev/mapper/crypt_scratch ]; then
        /usr/sbin/mkfs.ext4 -F -L TITAN_SCRATCH /dev/mapper/crypt_scratch

        # Ensure it is mounted so we can set permissions on the filesystem itself
        mount /scratch

        # Set permissions:
        # 1 = Sticky bit (only owners can delete their own files)
        # 777 = Read/Write/Execute for Everyone
        chown root:root /scratch
        chmod 1777 /scratch

        exit 0
    fi
    sleep 1
done
echo "Scratch device did not appear after 10 seconds, giving up."
exit 1
Next, the systemd service that actually runs this script, at /etc/systemd/system/prep-scratch.service:
[Unit]
Description=Format Ephemeral Scratch Space
DefaultDependencies=no
After=cryptsetup.target
Before=scratch.mount

[Service]
Type=oneshot
ExecStart=/usr/local/sbin/prep-scratch.sh
RemainAfterExit=yes

[Install]
WantedBy=scratch.mount
And a second service to fix permissions after the mount happens, at /etc/systemd/system/fix-scratch-perms.service:
[Unit]
Description=Set Universal Permissions on Scratch Mount
After=scratch.mount
Requires=scratch.mount

[Service]
Type=oneshot
ExecStart=/usr/bin/chmod 1777 /scratch
ExecStartPost=/usr/bin/chown root:root /scratch
RemainAfterExit=yes

[Install]
WantedBy=scratch.mount
Finally, the fstab entry itself:
# The ephemeral scratch pad
/dev/mapper/crypt_scratch /scratch ext4 defaults,noatime,noexec,nosuid,nodev 0 2
And so that CLI processes and pipelines actually use this new scratch space, I set the TMPDIR environment variable to TMPDIR=/scratch/. Well-behaved applications pick that up automatically; any stragglers just fall back to /tmp, handled by Ubuntu the standard way. Compared to the limits of 64GB of RAM, this space is effectively limitless, and it vanishes on power off or reboot since the ephemeral key only ever lives in RAM.
Cloudflare Zero Trust for Remote Access
We use the Cloudflare Zero Trust system for remote access. That matters for a lab environment specifically because it replaces a flat VPN, where anyone on the network can reach anything, with strong authentication and access control enforced per service at the network level. We also geofence access to the United States, which helps to the extent that’s meaningful since location can be spoofed, so I treat it as one more layer rather than a hard boundary. Combined with application-based and geographic access control, it lets us design toward a highly CJIS-conformant security posture, the FBI’s Criminal Justice Information Services Security Policy, which matters directly given the kind of government clients Metadata Minder serves. To be clear, that’s not a claim that Cloudflare itself is CJIS-certified, it’s one enforcement layer in a CJIS-aligned architecture. Once set up it is an extremely powerful set of tools that let us not only manage remote VPN access through trusted clients but also to point a Cloudflare edge routed domain, access controlled through Google Authentication including 2FA, to access the platform’s web-based UI.
The Unofficial Branding Department
While all of that was happening, my daughter Evelyn, had her own project going. She hand drew the lab’s first mascots, Robie, Graphie, and Tag, a pair of robots and a small robotic companion who apparently keep the place running. They are framed and on display next to the server now.

Why It Matters
Titan is already running Metadata Minder’s document analysis pipeline for real government clients, but the bigger effect is what building it kicked off internally: an aggressive push to build out our ADA Title II and WCAG 2.1 conformance capability specifically, scanning a government website’s entire published document corpus for accessibility and metadata gaps at a scale that wasn’t practical to attempt before. That’s the platform we’re building on as the AI research side of the business grows. Somewhere between a Micro Center manager waiving a GPU limit and my daughter’s marker drawings on the wall, that felt like exactly the right way to kick it off.
As for the physical security posture, the big picture is this: a boot disk that can come back from a reboot on its own but holds nothing sensitive, a data volume that cryptoshreds itself the moment the system loses power or the drives are pulled, swap and scratch space that generate a throwaway key every single time they’re used, and remote access gated behind Zero Trust with geographic restriction, the entire design aimed at a CJIS-conformant posture. Online, day-to-day security is handled the ordinary way, no different than any modern cloud application running in production. The offline threat model is the one that’s easy to skip when you’re focused on standing something up quickly, and it’s the one I made a point of taking seriously with Titan. That’s the foundation Metadata Minder’s government compliance work gets to build on from day one.
More build details and benchmarks to come as Titan takes on more of the workload.