User Interfaces, Firefox Extensions

Tutorial Index
- Extend Firefox!
- Development Overview
- Environment Setup
- Configuration Files
- Creating GUIs
- The Backend
- Preferences
- Localization
- Distribution
- Security
- Slides
GUIs
Overview
Most Firefox extensions have one goal in common: wanting to add or change some graphical element(s) in Firefox. Fortunately for us, adding and modifying GUIs (Graphical User Interfaces) is quite easy thanks to the decision to create an interfacing language specifically for Firefox, from the ground up. This language is called XUL (XML User Interface Language, pronounced zool) and is not too difficult to learn, as it follows the normal XML syntax.
Graphical elements, such as buttons, lists, menus, and windows, are all XUL elements that have been placed into an XUL file and loaded by the browser. XUL files are always found within the content section of a Chrome package. Remember the last step when we added the content line to the chrome.manifest? That told Firefox that the XUL files for that package, sample, could be found in that content directory. Thus, when making GUIs just put the .xul files in your content directory, along with any JavaScript files that will be needed.
Common Elements
Let’s look at some very common elements used in XUL. First, the button:
1
| |
It is that simple! Just give the button a label (for the GUI), an ID (so we can reference this element from the JavaScript), and a command to perform when pressed (in this case, we call a function).
Create a simple label to be placed on the window:
1
| |
Use a groupbox element to separate items into subsections. The General tab in the Options window uses this, for example.
1 2 | |
You can also use <hbox> and <vbox> to lay out elements horizontally or vertically, respectively.
1 2 3 4 5 6 7 | |
The following resource is wonderful at describing the different XUL elements you can use. Spend some time looking through the list so you will know what XUL has to offer.
http://xulplanet.com/references/elemref/
XUL Overlays
In addition to being able to create new elements on your own windows (see the Preferences section), you can also modify parts of the GUI that are already present. For example, let’s say we want to add a menu option to the Tools menu. This is quite simple:
1 2 3 4 5 | |
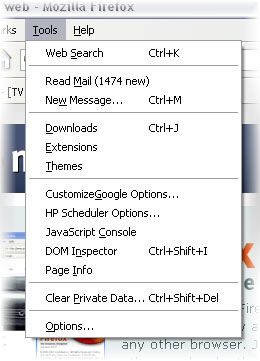
You can see that a new menuitem has been created and given a label, where to insert the item in the menu, and a command to run when clicked. But how does our code know to insert the menu item into the already created Tools menu? This is where XUL Overlays come into play. Your XUL file can be overlaid onto another (built-in) XUL file and Firefox will automatically merge the two files.
The XUL for menus can be found in chrome://browser/content/browser.xul. Thus, we need to overlay our xul file, say browser_overlay.xul onto the browser.xul file. We will do this by adding a line to our chrome.manifest file.
1
| |
This line tells Firefox to merge the data in the browser_overlay.xul anytime the browser.xul file is loaded. Notice the first line in the code, above:
1 2 3 | |
If you look in chrome://browser/content/browser.xul you will see that there exists a menupopup tag with the same ID that we used. This means that any children (the …) that we include within this child will be added to the browser file. This is called a merge point.
As another example we could add an icon to the status bar panel. First we determine what the merge point is using the DOM Inspector and find that its ID is ‘status-bar’. Now we can include this in our overlay file and anything inside it will be inserted at this location in the actual browser.xul file.
1 2 3 4 5 6 7 | |
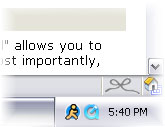
As the image shows, two icons have been added to the statusbar area. One is ours and one belongs to another extension that did the same thing (ReminderFox).
If you would like to remove an element that is already in the browser.xul file just add the removeelement attribute. For example, we could completely remove the Tools menu!
1
| |
Further Reading
- XUL Planet: http://xulplanet.com
- XUL Element Reference: http://xulplanet.com/references/elemref/